

What is FTPS?
Secure File Transfer Protocol was invented to support the existing FTP with safety/security features. Although being around for ages, FTP’s drafting does not consider safety its prime feature. This was when FTPS came into the picture.
FTPS, also known as FTP Secure and FTP-SSL, is an extension of File Transfer Protocol, retaining every functionality found in FTP. However, it acquires support from the cryptographic protocols Transport Layer Security and Secure Socket Layer and encrypts the information transmitted through it across the web.
FTPS changed the concerns of sending files and data over the public network. Sending data without encryption on a public network imposes multiple security threats. FTPS ensures that businesses connect securely with their trading partners, users, and customers. Move further to learn the working of FTPS in detail.
How Does FTPS Work?
FTPS centralizes TLS/SSL digital certificate, a certificate based on X.509 digital certificate standard. It is further improved via Extended Usage Key Attributes, which encrypts the transmitted data between the FTPS client and the FTPS server. Moreover, using TLS/SSL certificates, users tend to use the user authentication process to acquire access to protected information.
These digital certificates also consist of two key sets: public keys and private keys. While the public key validates and encrypts data, the private key decrypts these data. Public keys are also widely available to the users, whereas private keys are stored separately from the public key, and only FTPS clients and servers can access it.
Then, FTPS implements a sturdy encryption algorithm to augment its security. To do so, it includes AES, Triple DES, RC2, and RC4. It also supports hashing functions like SHA, MD5, and MD2.
Fortunately, because of its robust cryptographic features, it is set up in a way that complies with multiple security requirements like HIPAA, HITECH, SOX, and PCI DSS, among others.
When this TLS/SSL authentication takes place, it is called Implicit FTPS. From beginning to end, it ensures that both Control and Data Channels are entirely secure. In this FTPS, a secure connection is compulsory. It also defines a specific port for the client to use for secure connections, 990. However, it does not allow non-FTPS clients to communicate with the FTPS client, making it a deprecated protocol and is not used
Besides Implicit FTPS, another method that invokes a secure connection is Explicit FTPS. Also known as FTPES, it enables clients to explicitly request an elevated level of security from the server. When the request is sent, both the server and the client must agree on a mutually supported encryption method and use it going forward.
Advantages of FTPS
The advantages of FTPS are:
- FTPS uses two different connections that run asynchronously to acquire the highest data transfer speed possible.
- It enables you to track users’ movements during sessions since it logs everything on its server.
- It is highly secure, reliable, and flexible since it encrypts usernames, passwords, and data content.
- It uses understandable human communication.
- TLS/SSL constitutes a suitable authentication mechanism, including X.509 certificate features.
- Several internet communication frameworks contain built-in FTP and TLS/SSL support.
In this guide, we will show you how to install a secure FTP server on Windows using IIS.
Add IIS and FTP Server Features
By default, IIS and FTP features are not enabled on the Windows server. So you will need to enable them using the Windows Server Manager. Follow the below steps to enable the IIS and FTP features:
Step 1 – Search for Server Manager and open it. The following screen displays:
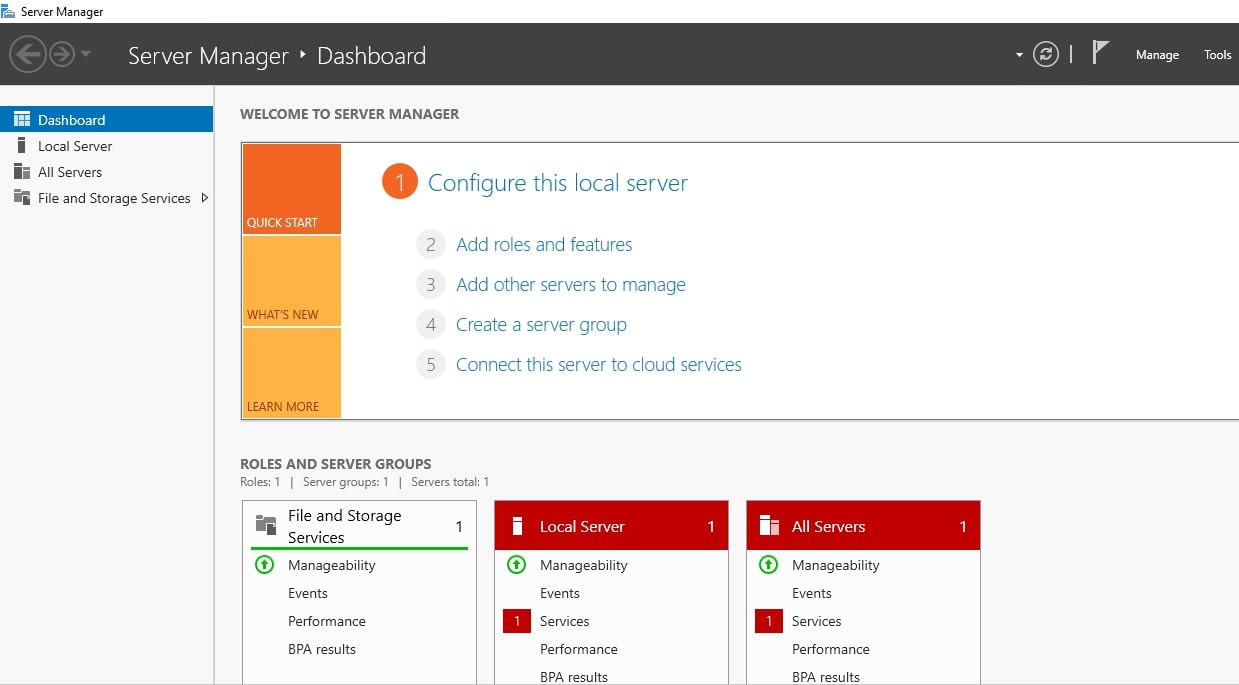
Step 2 – Click on the Add roles and features. You should see the Select installation type screen:
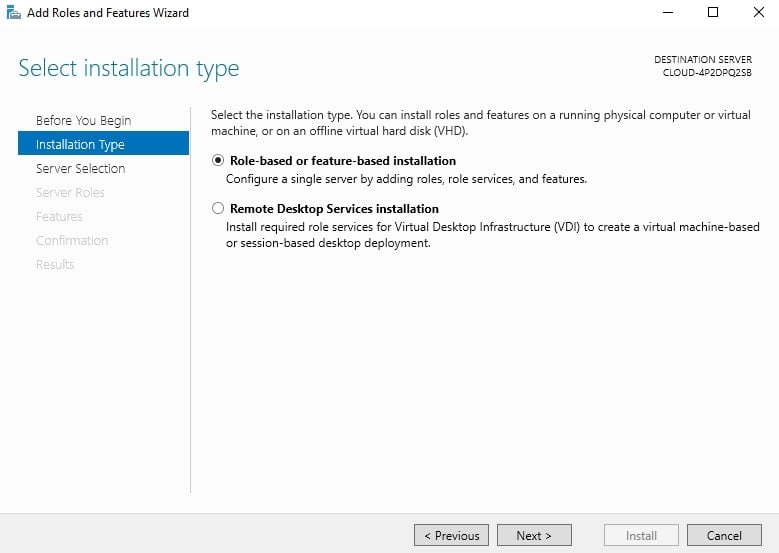 Step 3 – Select the Role-based or feature-based installation and click on the Next button. You should see the Select destination server screen:
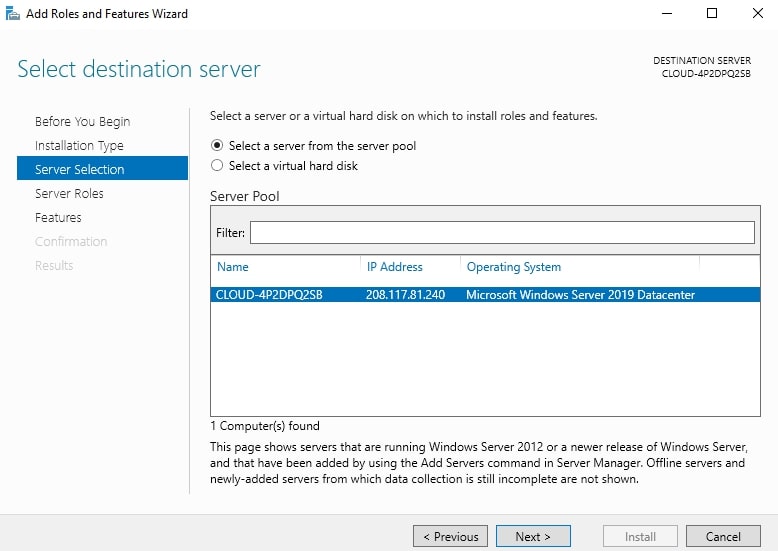
Step 4 – Choose Select a server from the server pool and click on the Next button. You should see the Select server roles screen:
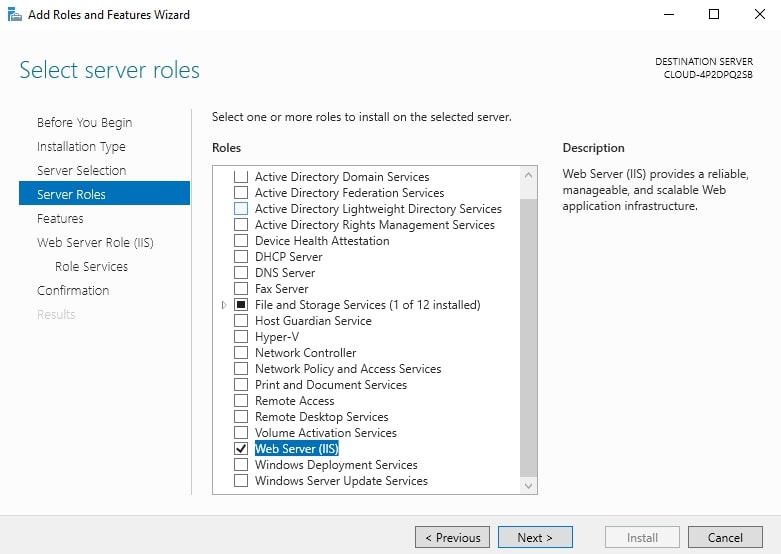
Step 5 – Select the Web Server (IIS) roles and click on the Next button. You should see the Select Features screen:
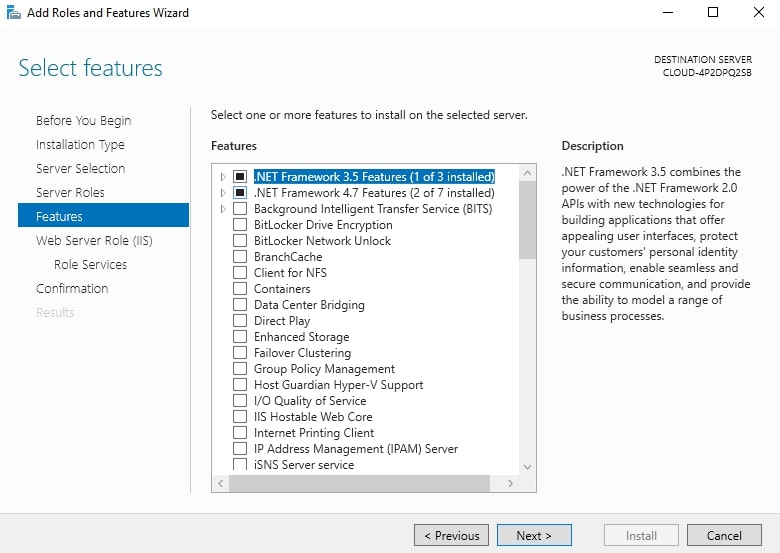
Step 6 – Leave all default options and click on the Next button. You should see the Web Server Role screen:
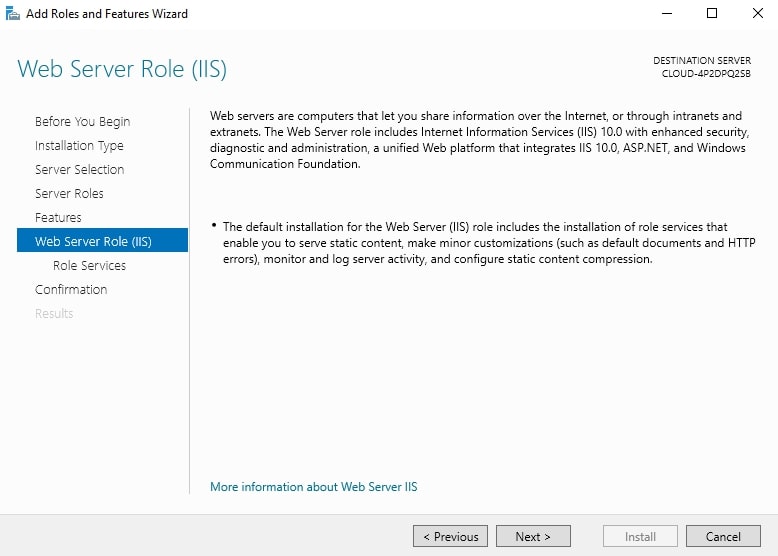
Step 7 – Click on the Next button. You should see the Select Role services screen:
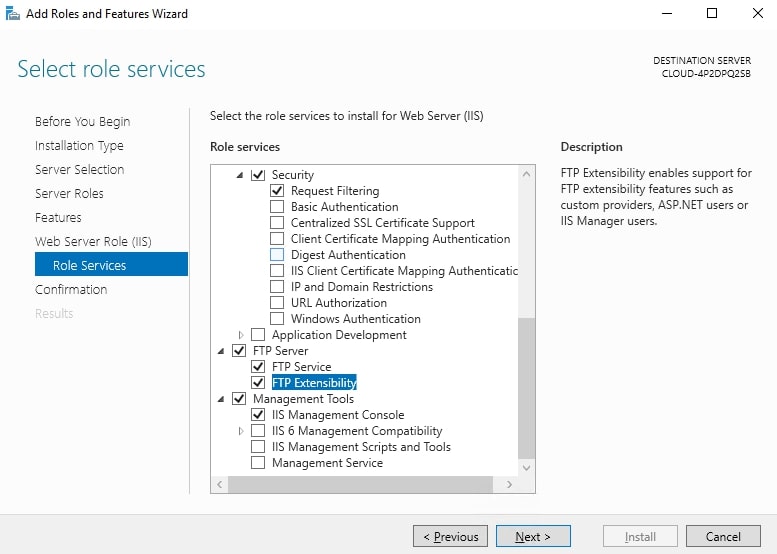
Step 8 – Select the Role Services and FTP Server. Click on the Next button. You should see the Confirm installation selections screen:
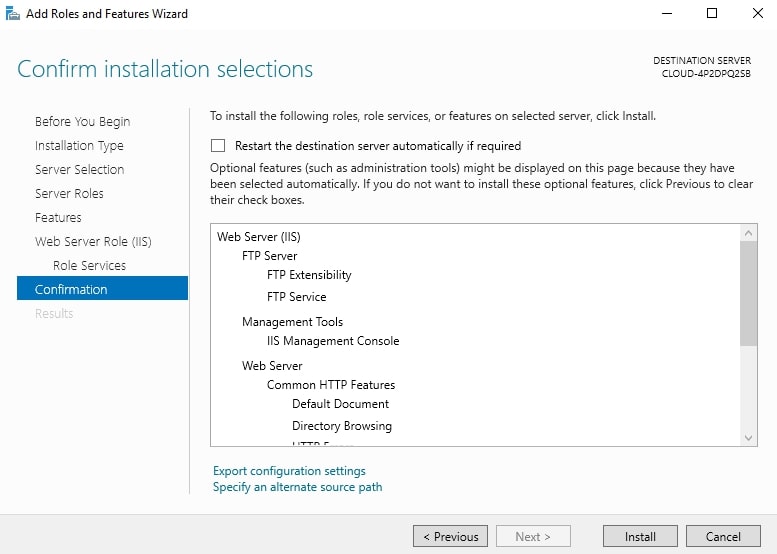
Step 9 – Verify all configurations and click on the Install button to install the IIS and FTP features on your server.
Wait for some time to finish the installation. Once the installation has been finished, restart your system to apply the changes.
Create a Self-signed SSL Certificate
Next, you will need to create a self-signed SSL certificate to establish an SSL connection between the FTP client and the FTP server. The SSL certificate holds information about the server’s identity, and encryption techniques to establish a secure channel. You can use the self-signed SSL certificate only for the internal network. For a public network, you will need to buy the SSL certificate from the online certificate authority.
Follow the below steps to create a self-signed SSL certificate:
Step 1 – On the Server Manager, click on the Tools => Internet Information Services (IIS) Manager. You should see the IIS dashboard:
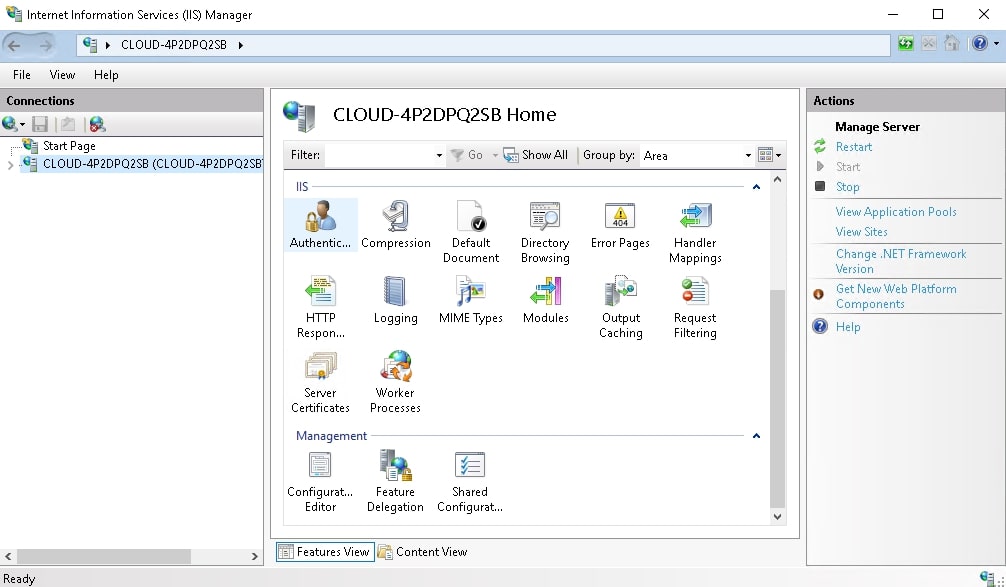
Step 2 – Select your server and click on Server Certificates. The following screen displays:
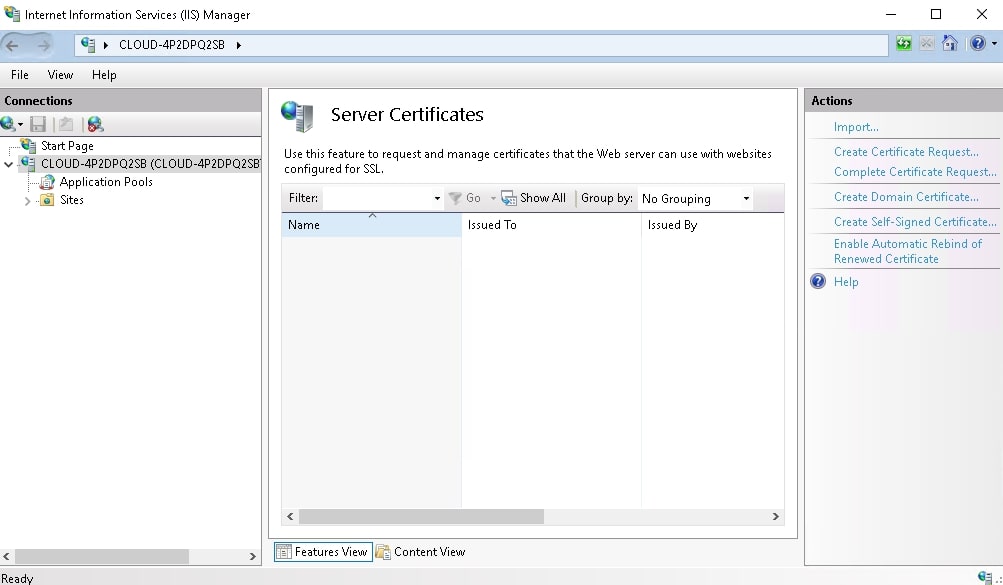
Step 3 – On the right pane, click on the Create Self-Signed Certificate. The following screen displays:
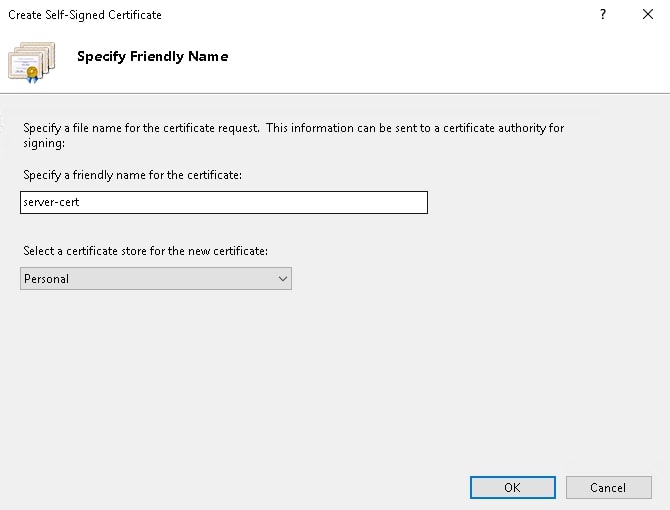
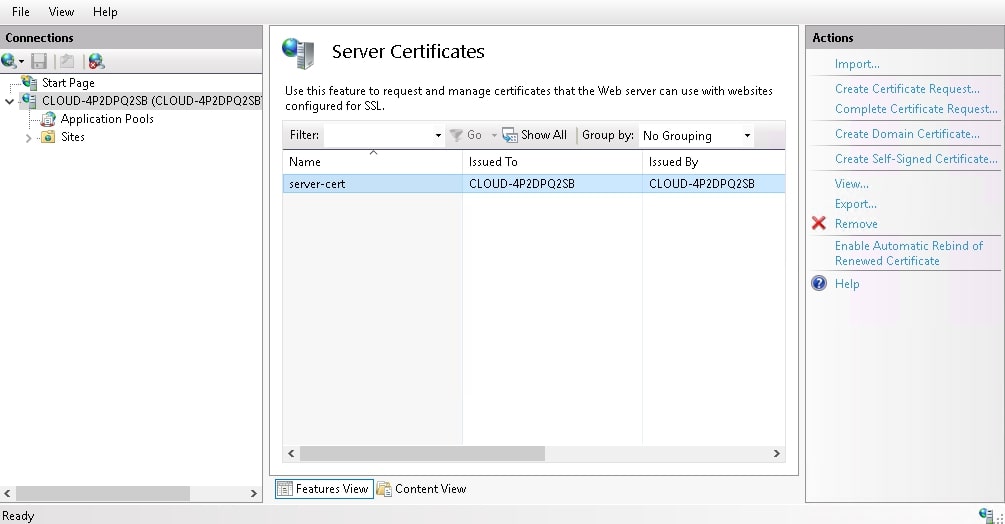
Step 4 – Provide your certificate name and click on the OK button. You should see your server certificate on the following screen:

Create an FTP User
Next, you will need to create an FTP user and assign proper permission to connect to the FTP server. Follow the below steps to create a user:
Step 1 – Open the Server Manager => Tools => Computer Management. The following screen displays:
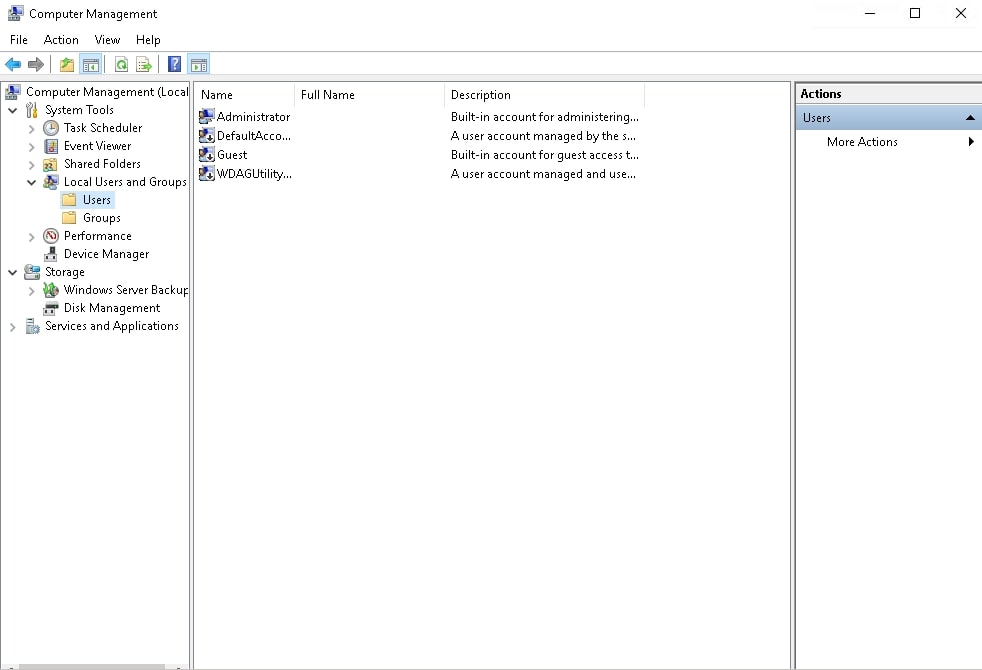
Step 2 – Expand the Local Users and Groups, right-click on the Users => New User. The following screen displays:
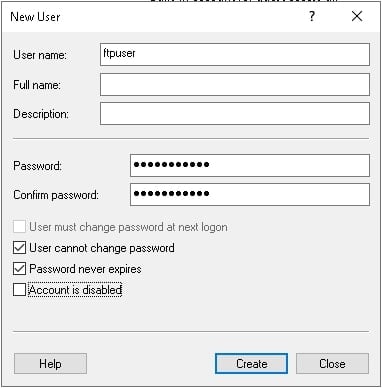
Step 3 – Provide your user information and click on the Create button.
By default, the FTP server stores its content inside the C:\inetpub\ftproot directory. So you will need to give the new user permission to the FTP root folder.
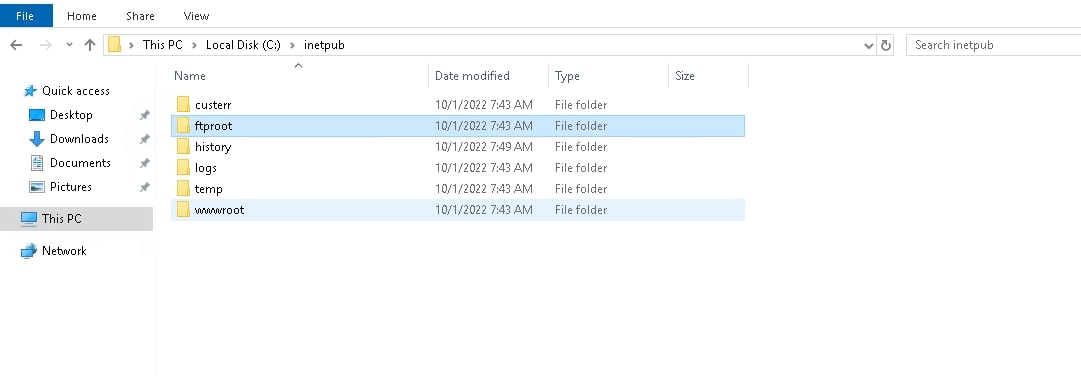
Step 4 – Go to the C:\inetpub folder, right-click on the ftproot and click on Properties. The following screen displays:
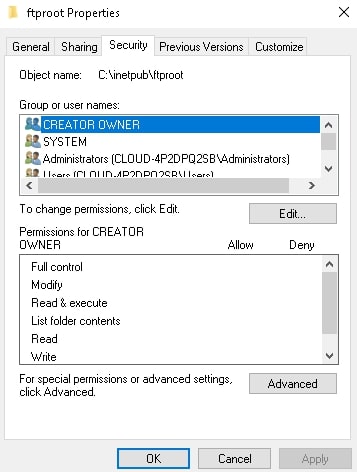
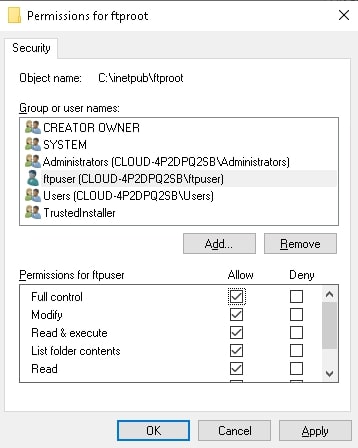
Step 5 – In the Security tab, select CREATOR OWNER and click on the Edit button. Then, click on the Add button, add your ftpuser, provide full control, then click on the OK button.
Create an FTP Site Using IIS
The IIS manager provides an easier way to create an FTP server. Follow the below steps to create an FTP site:
Step 1 – Open the IIS Manager from the server manager.
Step 2 – Expand your server and click on the Sites button. The following screen displays:
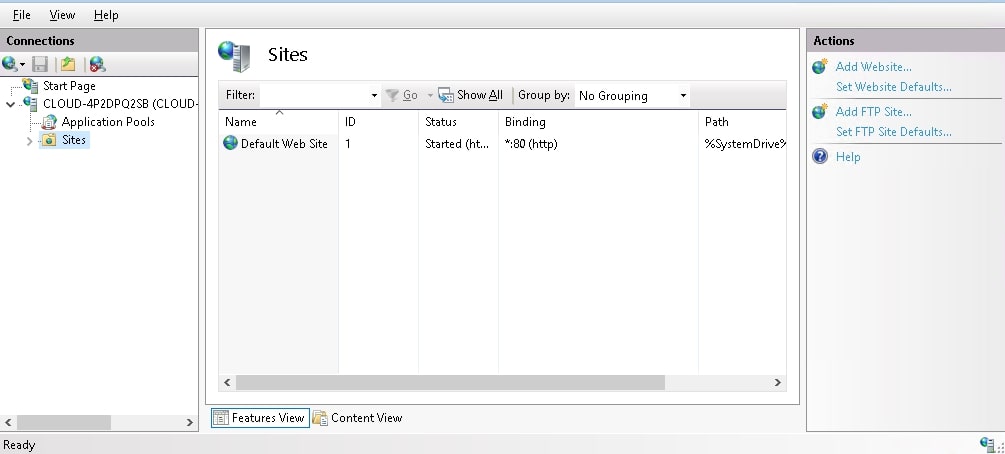
Step 3 – Click on the Add FTP Site on the right pane. The following screen displays:
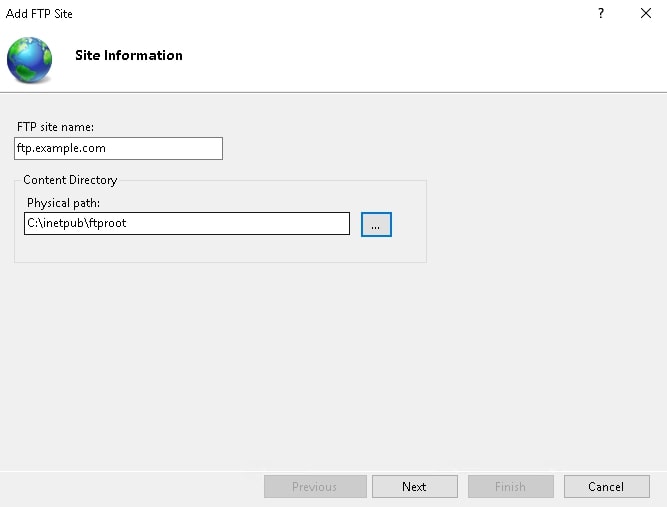
Step 4 – Provide your FTP site name, and FTP directory path, and click on the Next button. The following screen displays:
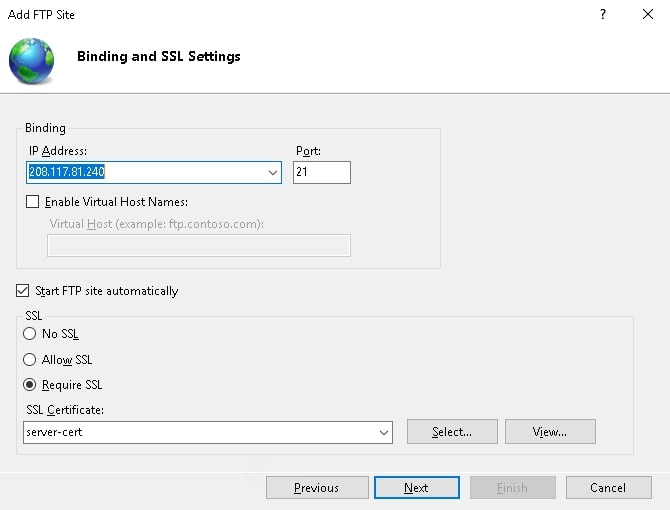
Step 5 – Provide your server IP port, select Require SSL, locate your certificate, and then click on the Next button. The following screen displays:
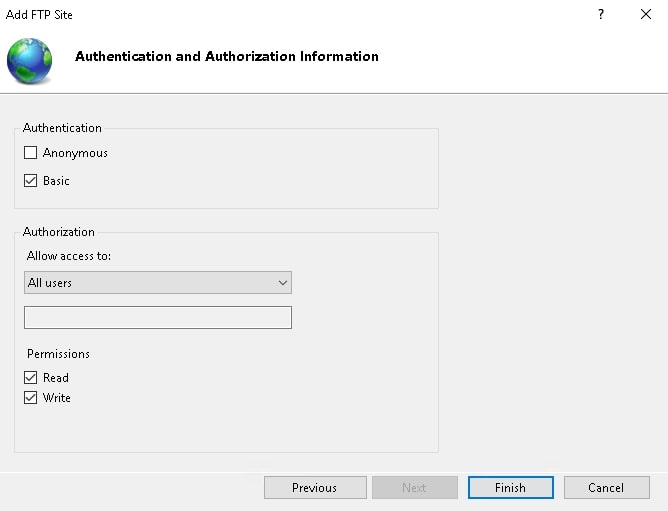
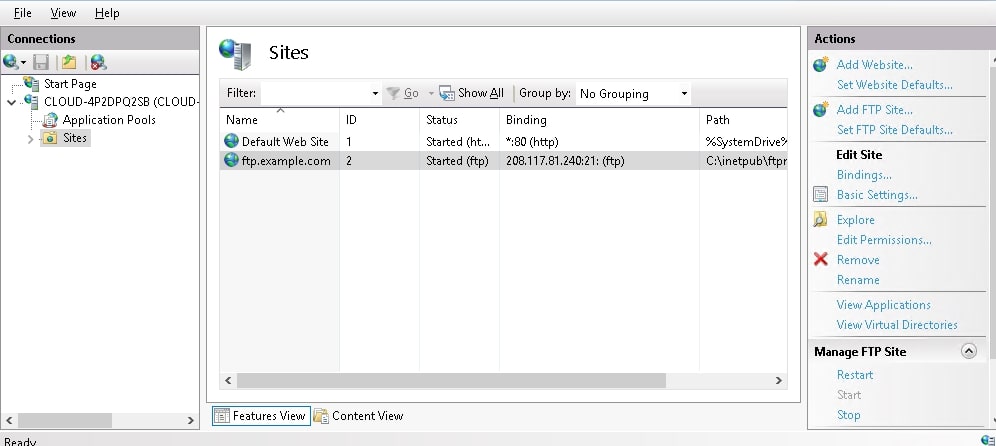
Step 6 – Select the Basic authentication. Allow all users, grant read/write permission, then click on the Finish button. Once your FTP site is created, The following screen displays:
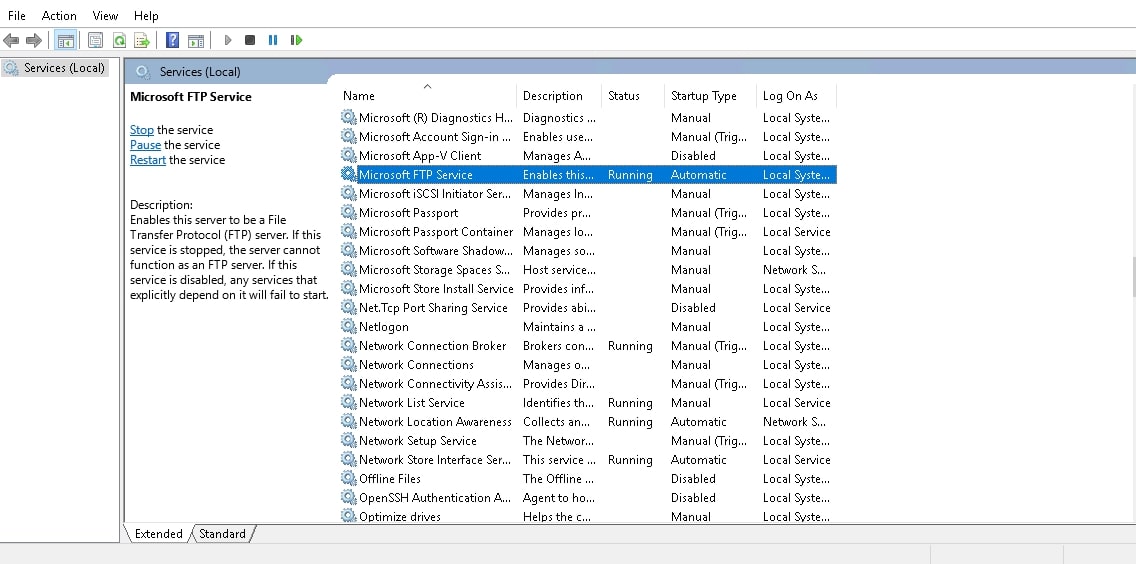
Step 7 – Finally, open the Service App, look for Microsoft FTP Server, and click on Restart.
Configure Firewall
Next, you will need to allow the FTP port 21 via the Windows built-in firewall. Follow the steps below to create Firewall rules for FTP.
Step 1 – First, open the Windows Firewall from the Control Panel. The following screen displays:
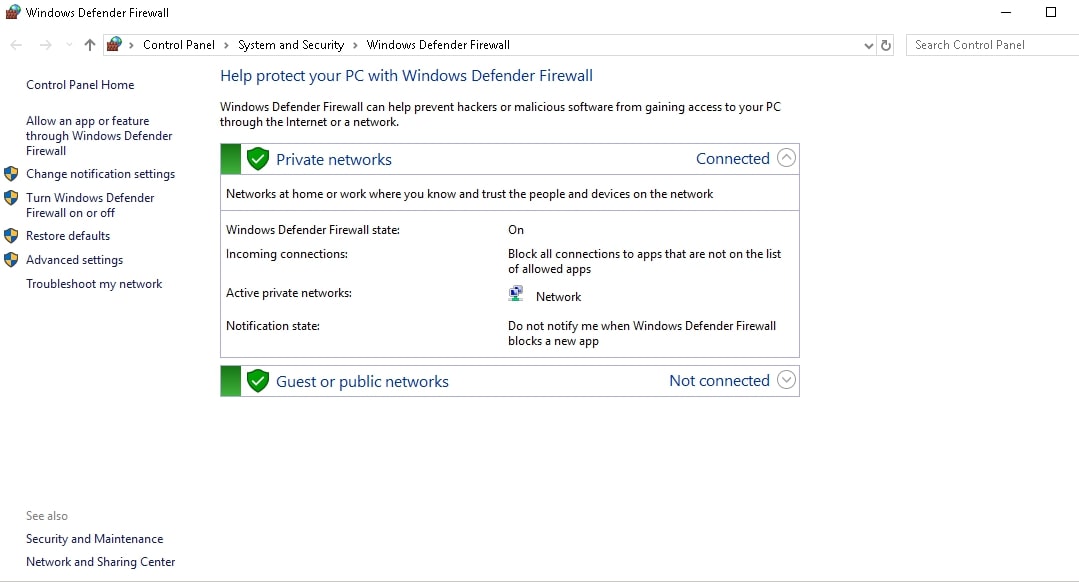
Step 2 – Click on the Advanced settings in the left pane. The following screen displays:
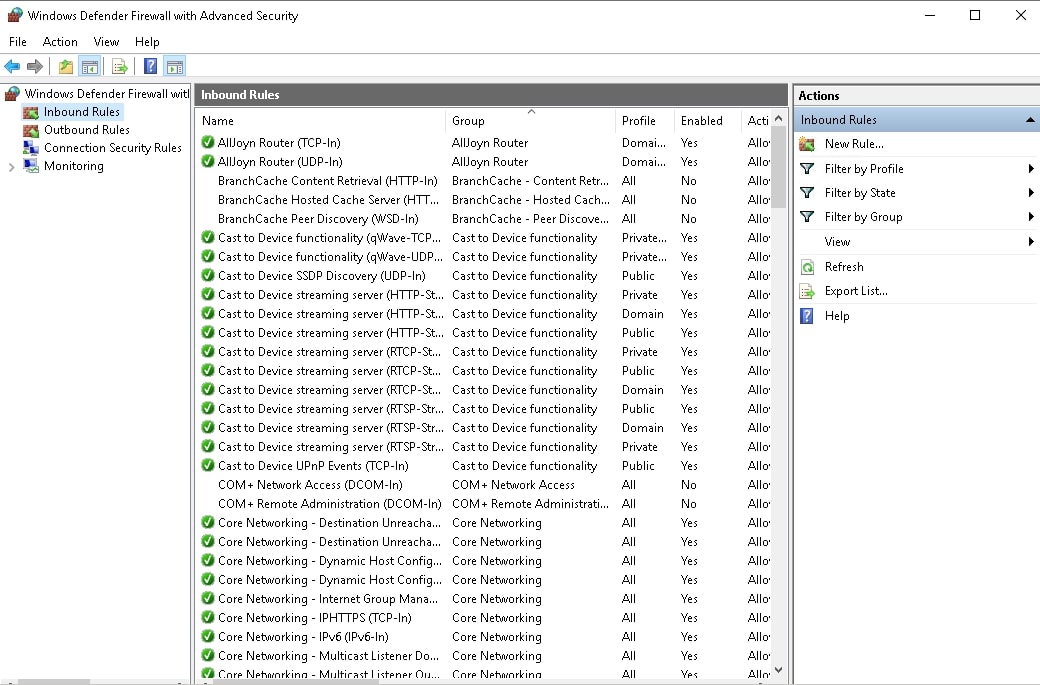
Step 3 – Click on the New Rules in the right pane. The following screen displays:
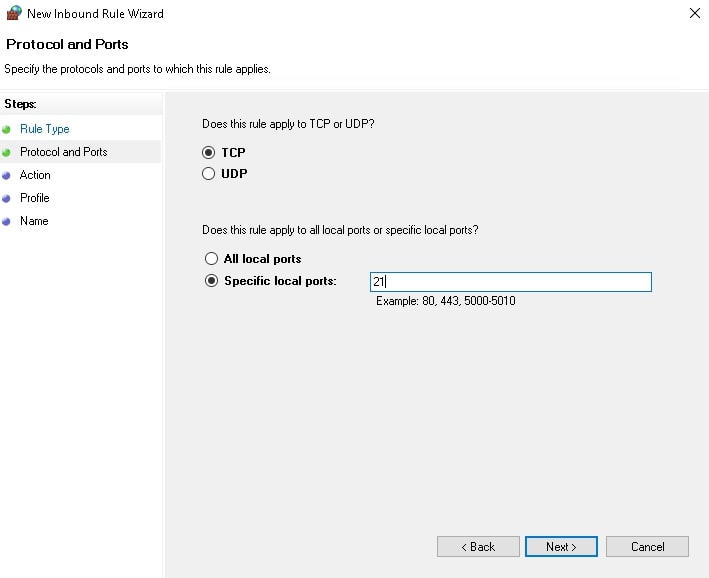
Step 4 – Provide your FTP port and click on the Next button. The following screen displays:
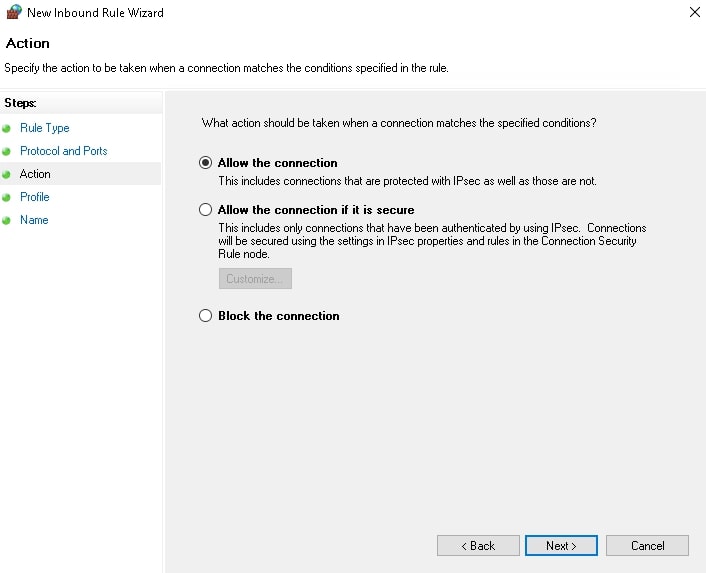
Step 5 – Select Allow the connection and click on the Next button. The following screen displays:
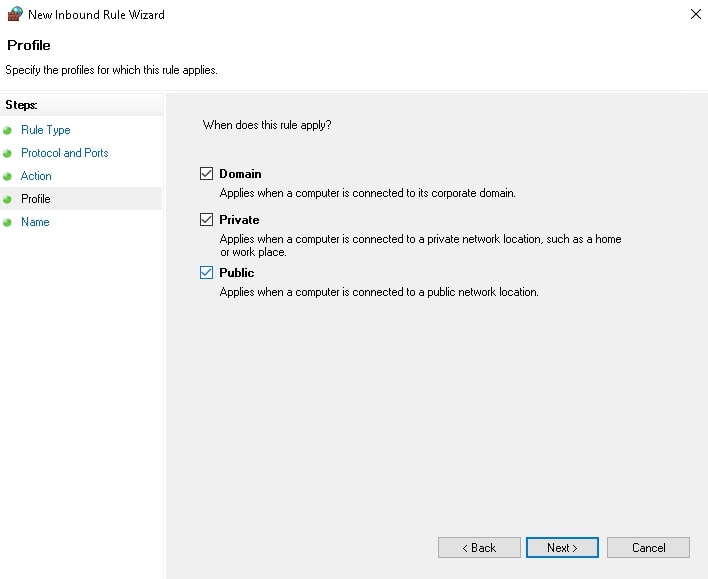
Step 6 – Select all profiles and click on the Next button. The following screen displays:
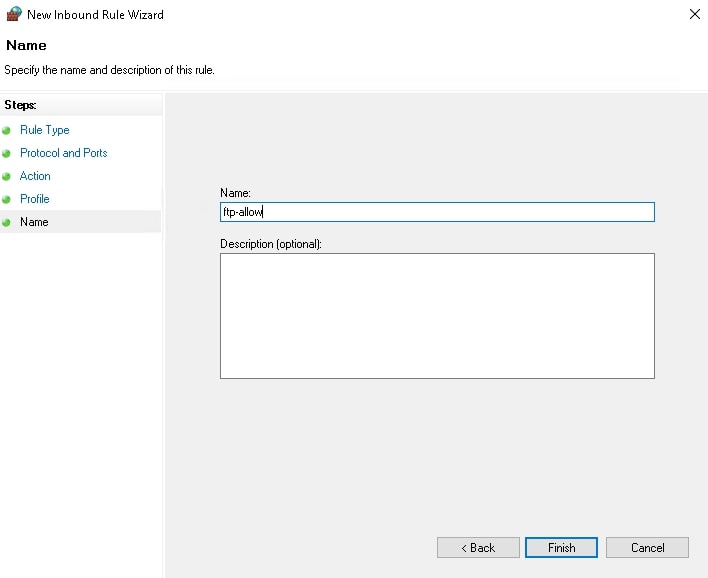
Step 7 – Provide your FTP rules name and click on the Finish button.
Connect Your Secure FTP Server
There are several ways you can connect to your secure FTP server.
- Use Web Browser – You can open any web browser on your server and type the URL ftp://your-ftp-ip to access the FTP server.
- Use FTP Clients – You can use third-party clients like FileZilla and Serv-U FTP Server with integrated FTP Web Client to access the FTP server.
- Files.com – You can also use cloud-based file transfer solutions like Files.com to connect your FTP server. With Files.com, you can mount your IIS external FTP site directly into Files.com as a folder. Thus, Files.com acts as an FTP Client and makes your FTP site available via the Files.com web interface.
